
Remember that frustrating moment when your 1996 Dodge Dakota suddenly sputtered to life, leaving you stranded on the side of the road? It’s a scenario most Dakota owners have experienced at some point. While it’s easy to assume the worst, a common culprit behind electrical malfunctions is a blown fuse. Understanding the 1996 Dakota fuse box diagram is your key to tackling these issues head-on, saving you time, money, and a whole lot of frustration.

Image: wiringdatabaseinfo.blogspot.com
Armed with the right information, you can confidently diagnose and replace blown fuses, putting your Dakota back on the road quickly. This guide will walk you through the intricacies of the 1996 Dakota fuse box diagram, providing you with the knowledge you need for efficient electrical troubleshooting. Let’s dive in and get you back on the road in no time!
The Fuse Box: Your Vehicle’s Electrical Lifeline
The fuse box acts as a critical safety system in your 1996 Dodge Dakota. It houses a series of fuses, each protecting a specific electrical circuit within your vehicle. These fuses are designed to melt and break the circuit if an overload occurs, preventing potential damage to your vehicle’s electrical system. Understanding the role of each fuse within the fuse box is crucial for effective troubleshooting.
Located within the fuse box are fuse legends, providing a clear roadmap to each fuse and its designated circuit. You’ll find these legends either printed on the fuse box cover or in your owner’s manual. The legends typically include the fuse’s amperage rating, a descriptive label indicating the circuit it protects, and its position within the fuse box.
Delving Deeper: The 1996 Dodge Dakota’s Fuse Box Layouts
The 1996 Dodge Dakota features two fuse boxes: the main fuse box located under the hood and an auxiliary fuse box typically found inside the passenger compartment. Each fuse box serves a distinct purpose, distributing power to separate components within your vehicle.
Under the Hood: The Main Fuse Box
The main fuse box, located under the hood, is responsible for protecting the essential electrical circuits that keep your engine running smoothly. These circuits cover essential functions like headlights, starter motor, engine control unit (ECU), and the ignition system.
The main fuse box is typically secured to the left side of the engine compartment, near the battery. It’s often protected by a cover that must be removed to access the fuses. The 1996 Dakota’s main fuse box contains a variety of fuse sizes and styles, ranging from standard blade fuses to larger fuses used for high-amperage circuits.
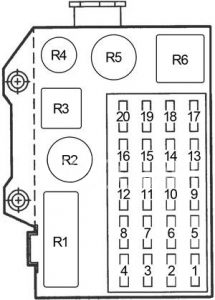
Image: www.autogenius.info
Passenger Compartment: The Auxiliary Fuse Box
The auxiliary fuse box, located within the passenger compartment, controls a diverse array of electrical components associated with comfort and convenience features. This box is responsible for powering items such as your radio, air conditioning, power windows, power locks, and other accessories.
The auxiliary fuse box in the 1996 Dakota is commonly positioned beneath the dashboard, typically on the driver’s side. You can usually find it by looking behind the glove box or underneath the steering wheel. The layout of this box may vary slightly depending on trim levels and options.
Harnessing the Fuse Box Diagram for Troubleshooting
The fuse box diagram becomes your ultimate weapon when troubleshooting electrical issues. This diagram acts as a visual guide, outlining the location and function of each fuse within the box. With the 1996 Dodge Dakota’s fuse box diagram in hand, you can pinpoint the specific fuse responsible for a malfunctioning circuit.
To use the diagram effectively, identify the specific circuit or component that’s exhibiting an electrical malfunction. Locate the corresponding fuse on the diagram, then match it to its physical location within the fuse box. Examine the fuse for signs of damage or melting. If the fuse appears blown, replace it with a new fuse of the same amperage rating. Failure to use the correct amperage rating could cause further damage to your electrical system.
Expert Tips for Fuse Box Mastery
Here are a few expert tips to elevate your fuse box troubleshooting game:
- Before attempting any repairs, disconnect the battery’s negative terminal to avoid electrical shocks.
- Always use a fuse puller tool to safely remove and replace fuses.
- Refer to your owner’s manual or a reputable online source for a detailed fuse box diagram specific to your 1996 Dodge Dakota model and trim level.
- If a fuse repeatedly blows, there’s likely a deeper underlying issue in the circuit. Consult a qualified mechanic to diagnose and repair the root cause.
- Keep a variety of spare fuses of different amperages in your glove box for quick fixes on the road.
FAQs About the 1996 Dodge Dakota Fuse Box
Q: Why does my fuse blow repeatedly even after replacing it?
A: If a fuse keeps blowing, it suggests a short circuit or overload within the circuit. This requires further investigation to identify the underlying issue, potentially involving a faulty wire, connector, or component. Consider consulting a mechanic for specialized diagnostics and repairs.
Q: Can I use a higher amperage fuse to “fix” a blown fuse?
A: Absolutely not. Using a fuse with a higher amperage rating can lead to dangerous electrical overload, resulting in overheating, fires, and potentially severe damage to your vehicle’s electrical system. Always replace a fuse with one of the same amperage rating.
Q: Where can I find a fuse box diagram for my 1996 Dodge Dakota?
A: You can reference your owner’s manual, consult reputable online automotive repair resources, or visit a local auto parts store. Be sure to specify your exact model and trim level for accurate information.
1996 Dodge Dakota Fuse Box Diagram
Embark on Your Own Fuse Box Adventures
Armed with this comprehensive guide, you’re well-equipped to approach electrical issues in your 1996 Dodge Dakota with confidence. Remember, understanding the fuse box diagram and its role in your vehicle’s electrical system is a valuable skill that can save you time, money, and those stressful roadside encounters.
Are you ready to conquer those electrical mysteries and keep your Dakota running smoothly? Share your experiences and any tips or tricks you’ve learned about the 1996 Dodge Dakota fuse box in the comments below!


