
Have you ever experienced a sudden drop in your car’s performance? Maybe your engine sputtered, hesitated, or even stalled? These could be signs of a malfunctioning Mass Airflow (MAF) sensor, a crucial component in modern vehicles that measures the amount of air entering the engine. While a trip to a mechanic is always an option, learning to check the MAF sensor with a multimeter can save you time and money, allowing you to diagnose the issue yourself.

Image: www.delphiautoparts.com
Recently, my old car started running rough. It felt like it was struggling to breathe, and I knew this wasn’t normal. After doing some research, I discovered that a faulty MAF sensor could be to blame. Armed with a multimeter and this guide, I was able to inspect the sensor myself, saving me a trip to the auto shop. This experience highlighted the importance of understanding how to test these critical components, empowering you to troubleshoot your vehicle more effectively.
Understanding the MAF Sensor
The Mass Airflow (MAF) sensor is a vital component in your car’s engine management system. It sits in the intake manifold, before the throttle body, and measures the amount of air entering the engine. This data is then sent to the engine control unit (ECU), which uses it to determine the appropriate amount of fuel to inject.
Think of the MAF sensor as the “lungs” of your car. It tells the engine how much air it’s breathing, allowing the ECU to fine-tune the fuel-air mixture for optimal combustion. A faulty MAF sensor can lead to a variety of issues, including poor fuel economy, engine misfires, rough idling, and even a check engine light.
How to Check a MAF Sensor with a Multimeter
Checking a MAF sensor with a multimeter is a relatively straightforward process that can help you determine if the sensor is functioning properly. Here’s a step-by-step guide:
Step 1: Gather Your Tools
Before you begin, gather the following tools:
- A multimeter
- A repair manual or online source for your specific vehicle model
- A small flat-head screwdriver (optional)
- A clean cloth or rag
- Safety glasses
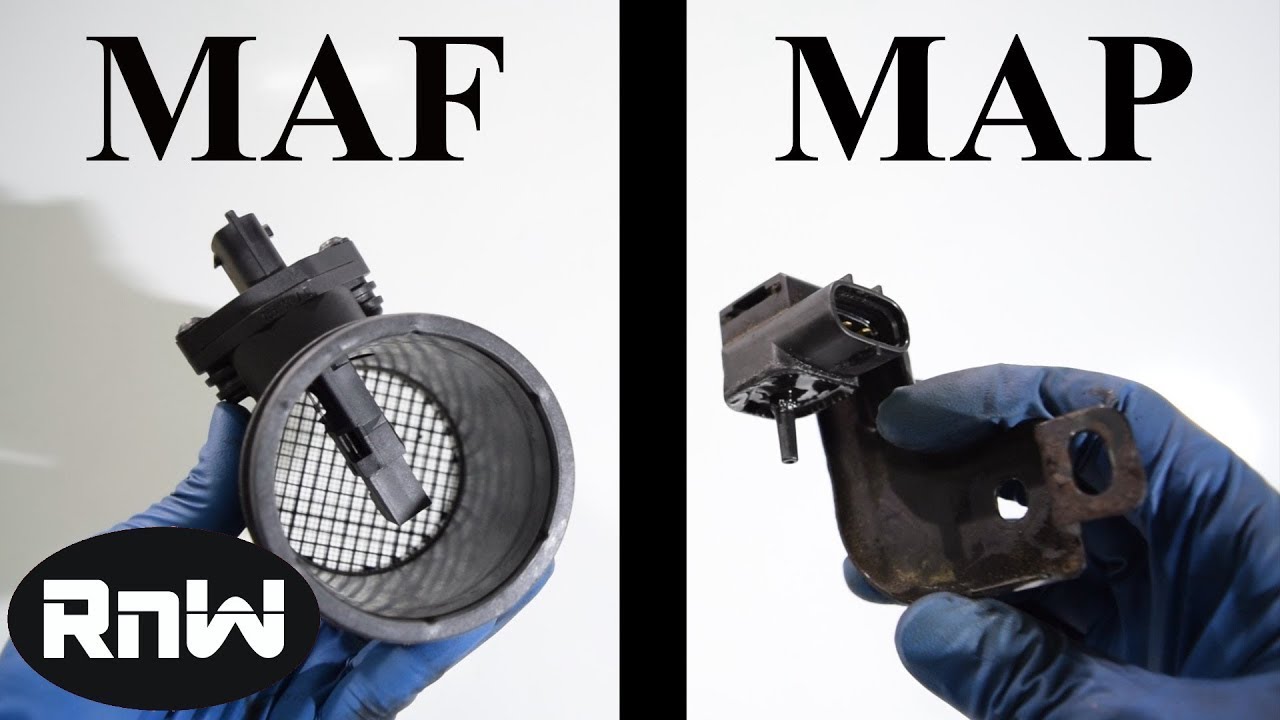
Image: userenginescott.z22.web.core.windows.net
Step 2: Locate the MAF Sensor
The location of the MAF sensor varies from vehicle to vehicle. Consult your car’s repair manual or an online resource to find its exact location. Typically, it’s found in the intake manifold, between the air filter box and the throttle body.
Step 3: Disconnect the MAF Sensor Connector
Carefully disconnect the electrical connector from the MAF sensor. Use your fingers to gently pull the connector apart. If necessary, a small flat-head screwdriver can help to pry the connector apart.
Step 4: Set Your Multimeter to Resistance Mode
Set your multimeter to the “ohms” or “resistance” setting. This mode allows you to measure the resistance across the MAF sensor’s internal components. The exact setting may vary depending on your multimeter model. Refer to your multimeter’s user manual for instructions.
Step 5: Test the MAF Sensor
With the connector disconnected, touch the probes of your multimeter to the corresponding terminals on the MAF sensor. The exact terminals will be specified in your vehicle’s repair manual. Most MAF sensors have four terminals: two for power, one for ground, and one for signal.
Test the resistance between the power terminals and the ground terminal. You should get a reading between 5 and 15 ohms. If the reading is outside this range, or if you get an open circuit (infinite ohms), the MAF sensor may be faulty. You can also test the resistance between the signal terminal and the ground terminal. This reading should be in the range of 10 to 20 ohms.
Step 6: Check the MAF Sensor’s Wiring
If the MAF sensor itself tests within the proper resistance range, but you’re still experiencing engine issues, it’s possible the wiring is faulty. Use your multimeter to check the continuity of the wires leading to the MAF sensor. This involves testing for a complete path between the sensor connector and the ECU’s wiring harness.
Troubleshooting a Faulty MAF Sensor
Once you’ve identified a faulty MAF sensor, the next step is to address the problem. While replacing the sensor is often the most effective solution, there are a few troubleshooting steps you can take before resorting to a new sensor.
- Clean the MAF Sensor: A dirty MAF sensor can cause inaccurate readings. Carefully clean the wires and the sensing element using a dedicated MAF sensor cleaner. Avoid using harsh chemicals or solvents that can damage the sensor.
- Check for Damaged Wiring: Inspect the wiring leading to the MAF sensor for any frayed or broken wires. If you find any damaged wires, repair or replace them before installing a new sensor.
- Replace the MAF Sensor: If cleaning the sensor or repairing the wiring doesn’t solve the problem, it’s likely time to replace the MAF sensor. Ensure you purchase a new sensor specifically designed for your vehicle model. Refer to your repair manual or consult a trusted auto parts store for the correct part.
Tips and Expert Advice
Here are some expert tips to help you avoid MAF sensor issues in the future:
- Regular Maintenance: Regularly inspect the MAF sensor for dirt and debris. Cleaning it at least once a year can help prevent performance issues.
- Use Quality Air Filters: Install high-quality air filters to prevent dust and dirt from reaching the MAF sensor. Replace the air filter regularly, as recommended by your vehicle manufacturer.
- Protect from Oils and Sprays: When servicing your engine, avoid spraying oils or cleaning agents directly onto the MAF sensor. These substances can contaminate the sensor and lead to inaccurate readings.
Frequently Asked Questions (FAQs)
Q: What are the symptoms of a faulty MAF sensor?
A: A faulty MAF sensor can cause a variety of symptoms, including:
- Rough idling
- Engine stalling
- Reduced engine power
- Hesitation during acceleration
- Increased fuel consumption
- Check engine light (CEL) illuminated
Q: Can I replace the MAF sensor myself?
A: While replacing a MAF sensor is generally a straightforward process, it can vary depending on your vehicle model and your level of mechanical experience. If you’re comfortable working on your car, you can find comprehensive repair guides online or in your vehicle’s repair manual. However, if you’re unsure, it’s best to consult a qualified mechanic.
Q: How much does a MAF sensor cost?
A: The cost of a new MAF sensor can vary depending on the make and model of your vehicle. However, they’re generally affordable, ranging from around $50 to $200. It’s best to check with a local auto parts store or online retailers to get accurate pricing for your specific vehicle.
How To Check Maf Sensor With Multimeter
Conclusion
Checking your MAF sensor with a multimeter is a valuable skill for any car owner. Understanding how to test and troubleshoot this important component can save you time and money in the long run. Remember to use a quality multimeter, consult your vehicle’s repair manual, and take necessary safety precautions. By following these steps, you can diagnose and potentially resolve MAF sensor issues before they become major problems. Are you interested in learning more about car maintenance and repair?


