
Ever heard that unsettling click, followed by the sudden silence of your car’s dashboard? It’s a scene that’s sent shivers down the spines of countless drivers. But what if you could calmly navigate these electrical hiccups without the stress of towing fees and mechanic visits? The 2011 Toyota Camry fuse box diagram is your key to unlocking the mysteries of your car’s electrical system and potentially saving you a fortune in repair costs.

Image: in.thptnganamst.edu.vn
The fuse box diagram, much like a road map for your car’s electrical system, reveals the vital connections that power your headlights, power windows, radio, and everything in between. This is your guide to understanding the flow of electricity in your vehicle, allowing you to pinpoint problems quickly and confidently. Let’s delve into this diagram and equip you with the knowledge to tackle electrical issues head-on.
Navigating the Fuse Box: A Step-By-Step Guide
The 2011 Toyota Camry houses two fuse boxes: one located in the passenger compartment and another under the hood. Finding them is a breeze: the passenger compartment fuse box is usually tucked away near the driver’s side of the dashboard, while the under-hood fuse box resides in a black box near the battery.
Deciphering the Diagram: Keys to Understanding Your Car’s Electrical System
The fuse box diagram might seem daunting at first, but it’s actually quite intuitive. Most diagrams are organized in a logical fashion, visually identifying each fuse by its location and its corresponding function. Take a deep breath, gather your magnifying glass, and let’s break down this electrical blueprint:
- Fuse Numbers: These are the first things to look for. Each individual fuse is assigned a sequential number, making locating them effortless.
- Amperage: The next crucial piece of information is the amperage rating of the fuse. This rating indicates how much current a fuse can handle before melting, protecting your car from short circuits and overloads.
- Function Descriptions: You’ll usually find a description of the component each fuse protects. These descriptions will help you pinpoint which fuse is responsible for the malfunctioning component.
Common Fuse Box Symptoms: Recognizing the Trouble Signals
While it’s ideal to consult the diagram as a preventative measure, you’ll often encounter it during a car’s electrical distress. Here are some common symptoms that indicate a fuse problem:
- Dim Lights: A telltale sign that a fuse may be failing or compromised.
- Dead Power Windows: This symptom could indicate an issue with the fuse responsible for window operation.
- Non-Functioning Radio: A faulty fuse is a likely culprit if your beloved tunes are silent.
- Blown Headlights: A blown headlight fuse can leave you stranded in the dark, underscoring the importance of a functioning fuse box.
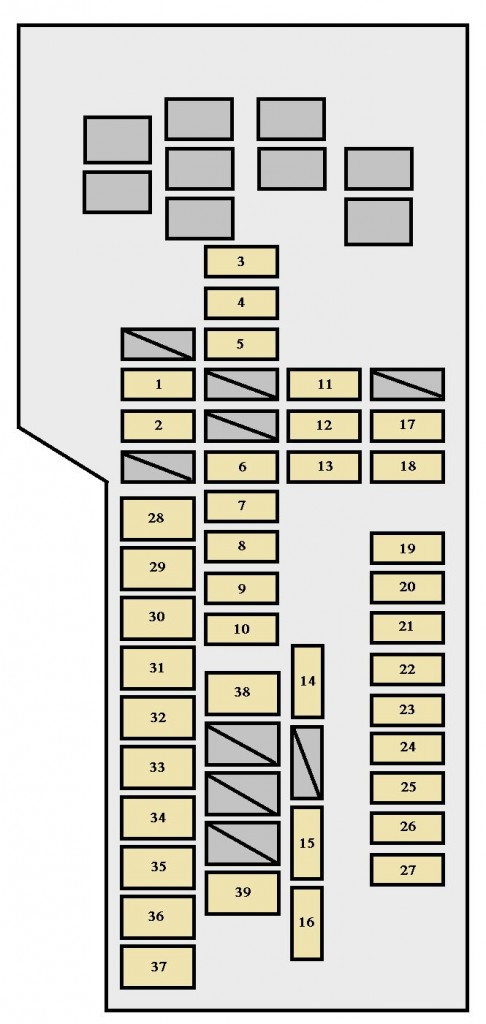
Image: www.autogenius.info
Troubleshooting Electrical Issues: A Step-by-Step Guide
Once you identify the symptom, the fuse box diagram becomes your compass. Here’s how to approach electrical troubleshooting:
-
Locate the Suspect Fuse: Using the diagram, pinpoint the fuse associated with the malfunctioning component.
-
Inspect and Test: Carefully examine the fuse for signs of damage, such as melting or discoloration. A test light or multimeter can definitively confirm if the fuse is blown.
-
Replacing the Fuse: If the fuse is blown, use a fuse of the same amperage rating to replace it. Always double-check the amperage rating before installing.
Essential Tips for Fuse Box Management:
- Keep a Spare Set of Fuses: Having an assortment of commonly used fuses handy in your car’s glove compartment can be a lifesaver in an emergency.
- Read the Owner’s Manual: The owner’s manual often provides detailed information about the fuse box, including specific fuse locations and troubleshooting tips.
- Consult a Professional: If you’re unsure about any aspect of fuse replacement or electrical troubleshooting, don’t hesitate to consult a qualified mechanic. They can provide expert guidance and ensure your vehicle’s electrical system operates safely and efficiently.
2011 Toyota Camry Fuse Box Diagram
Conclusion
The 2011 Toyota Camry fuse box diagram isn’t just a collection of symbols; it’s a key to a world of electrical understanding. With this knowledge in your back pocket, you can confidently face those unexpected electrical gremlins. By being proactive and equipped with the right information, you’ll take charge of your car’s electrical health and keep those embarrassing roadside breakdowns at bay.


